Metal hardware is what keeps every structure together. However, despite this, it’s also one of the first components to fail when exposed to the wrong conditions, causing corrosion.
Many homeowners are often surprised when they see rusted bolts, screws, or connectors in seemingly “dry” places. Though dry, stress corrosion can slowly damage the hardware through tension, humidity, and chemical exposure.
Because of this, it’s important to use the right hardware in the right location. That’s why we’re going to compare the main hardware materials on their stress corrosion resistance below.
What is Stress Corrosion
Stress corrosion is a form of metal deterioration that happens when metal under tensile stress is exposed to a corrosive environment, like moisture or chemicals. Over time, the combination of stress and a corrosive environment can cause microscopic cracks and corrosion that wouldn’t occur with stress or moisture alone.
The Problem with Standard Hardware
Homeowners are often surprised when they find rusty screws, bolts, or plates in areas that seem dry. For example, crawl spaces may not show visible water, yet wood near the ground often holds enough moisture to corrode standard hardware over time.
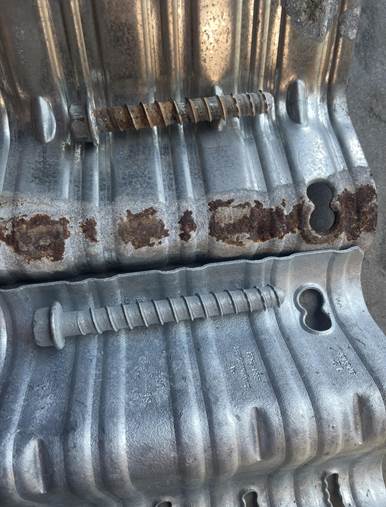
Accordingly, we’ve seen zinc-coated hardware rust in just two years in a “dry” crawl space. Zinc, however, is the industry-standard. In the image below:
Zinc Fastener Above After Two Years of Usage in Dry Crawl Space (contact with redwood mudsill and concrete foundation, no contact with pressure treated lumber), and HDG URFP Hardware Below
Hardware Material Comparison for Stress Corrosion
Not all metal hardware is created equal. Different materials and coatings offer varying levels of protection and performance.
Regular Steel
- Corrosion Resistance: Low
- Durability: Low
- Cost: Low
- Code Acceptance: Low
- Environmental Suitability: Dry interior only; not for crawl spaces, exterior, concrete contact, or pressure-treated wood.
Regular steel, often called bright steel, is strong but completely unprotected against corrosion. Without any coating or galvanization, it quickly rusts when exposed to air, moisture, or contact with wood or concrete. Under stress, corrosion speeds up.
Therefore, this material is only recommended for completely dry indoor environments. Think of interior framing or furniture assembly. It shouldn’t be used for anything structural or anywhere that has humidity.
Zinc
- Corrosion Resistance: Low to Medium
- Durability: Low to Medium
- Cost: Low
- Code Acceptance: Low (generally interior, non-treated applications only)
- Environmental Suitability: Dry indoor areas or very mild conditions; must avoid exterior exposure and treated lumber; although allowed, it is recommended to avoid crawl spaces and contact with interior concrete due to possible corrosion.
Zinc-coated steel, also known as electroplated galvanized, offers a thin protective layer that delays rust. However, it doesn’t prevent it long-term. Once the layer wears off or if a crack appears, corrosion can speed up rapidly.
Generally, zinc fasteners are okay for dry interior applications, like framing or furniture. For outdoor projects or treated lumber, they must not be used. For crawl spaces or contact with interior concrete, they shouldn’t be used as the coating may begin to rust.
Mechanically Galvanized
- Corrosion Resistance: Medium
- Durability: Medium
- Cost: Low to Medium
- Code Acceptance: Medium when coating meets ASTM/ESR (e.g., Class 55/65)
- Environmental Suitability: Interior or light exterior; acceptable for some retrofit/concrete anchors; avoid coastal or continuously wet locations.
Mechanically galvanized hardware has a much thicker zinc layer than electroplated steel. Therefore, corrosion resistance is improved. The coating, though, is only mechanically bonded and can chip or flake under load, exposing the steel underneath.
For performance, it’s okay. It is the next step up from zinc for many hardware applications. Typically, it’s used for light exterior work or semi-protected environments. It can even be used as an upgrade to zinc for concrete anchors or retrofit work, depending on the environment.
Hot-Dipped Galvanized
- Corrosion Resistance: High
- Durability: High
- Cost: Medium
- Code Acceptance: High (commonly required for treated wood/exterior)
- Environmental Suitability: Exterior and damp areas, crawl spaces, treated lumber, and concrete interfaces; not ideal for severe marine spray zones.
Hot-dipped galvanized (HDG) hardware offers one of the most corrosion-resistant coatings available. The steel is deep in molten zinc, creating a thick, bonded layer that protects against moisture and stress corrosion.
Generally, it’s the industry-standard for decks, anything exterior, and treated-wood applications. In some cases it is required, but at least always recommended for all crawl space work and foundation retrofits. Due to how the coating is applied, it offers long-term performance even in humid or damp environments. Please note, not all hardware is available in this option.
Simpson Strong Tie’s ZMAX
- Corrosion Resistance: Medium-High
- Durability: Medium-High
- Cost: Medium
- Code Acceptance: High (G185-level heavy galvanization)
- Environmental Suitability: Exterior and treated-wood connections (decks, crawl spaces, seismic retrofits); good general choice short of harsh marine exposure.
Simpson Strong-Tie’s ZMAX uses heavy galvanization, around double that of zinc. This ensures that it resists corrosion from moisture and pressure-treated wood.
Mainly, this is used for exterior and high-humidity applications, like decks, crawl spaces, and seismic trusses.
GRK’s Climatek
- Corrosion Resistance: High
- Durability: High
- Cost: Medium
- Code Acceptance: High (AC257/ICC-ES approved as HDG alternative)
- Environmental Suitability: Exterior structural and treated-wood uses, including crawl spaces and most coastal neighborhoods; avoid direct marine immersion/submersion.
GRK’s Climatek coating is a multi-layer finish that combines zinc and polymer protection. Tested under AC257 and ICC-ES standards, it meets and exceeds the corrosion resistance of hot-dipped galvanized hardware.
Due to their high resistance levels to stress corrosion, they are ideal for exterior structural work, crawl spaces, and treated-wood applications. The only real limit is direct marine or underwater environments.
Stainless Steel
- Corrosion Resistance: High
- Durability: High
- Cost: High
- Code Acceptance: High
- Environmental Suitability: Best for coastal/foggy or continuously damp areas; ideal for treated wood, concrete interfaces, and long-life exterior work.
Stainless steel fasteners are an excellent option for corrosion resistance and longevity. Containing chromium and often molybdenum, they naturally resist rust and stress corrosion without needing any additional coating.
You get two main types of stainless: A2 and A4. A2 is resistant to all non-salty water, and A4 is for saltwater protection. Therefore, A2 is used for most damp locations and A4, more coastal environments.
Comparing Hardware Materials for Corrosion Side-by-Side
| Material | Corrosion Resistance | Durability | Cost | Code Acceptance | Environmental Suitability |
| Regular Steel | Low | Low | Low | Low | Dry interior only |
| Zinc-Coated Steel | Low-Medium | Low-Medium | Low | Low | Dry indoor or mild conditions |
| Mechanically Galvanized | Medium | Medium | Low-Med | Medium | Interior or light exterior |
| Hot-Dipped Galvanized (HDG) | High | High | Medium | High | Exterior, damp, and crawl spaces |
| Simpson Strong-Tie ZMAX® | Medium-High | Medium-High | Medium | High | Exterior and treated-wood use |
GRK’s Climatek | High | High | Medium | High | Exterior, treated wood, coastal |
| Stainless Steel (A2/A4) | High | High | High | High | Coastal, foggy, or damp areas |
What Hardware Material Should You Use?
The right hardware material depends on where and how it’s used. For dry indoor areas, zinc-coated fasteners can be used. However, in crawl spaces, basements, and outdoor projects, upgrading to at least hot-dipped galvanized or Simpson Strong-Tie’s ZMAX hardware is recommended.
For homes that are near the coast or exposed to high humidity, stainless steel hardware and fasteners are the best options. These can resist stress corrosion and even damp or salty air (A4 stainless steel only)
Why Should You “Upgrade” Your Hardware Material
When compared to regular steel, the costs of other fasteners with better stress corrosion resistance levels are higher. Therefore, why should you consider the upgrade?
Prevent Costly Repairs
The main reason is that corroded fasteners and connectors can lead to serious structural damage over time. Replacing rusted hardware often means taking apart prior work, which can be labor-consuming and expensive.
Invest in better hardware now, prevent replacement in the future.
Invest in Durability
Upgraded materials like HDG, ZMAX, and stainless steel are built to last. They maintain their strength under tension, resist environmental wear, and prevent premature hardware failure, making them much more durable.
Protect Against Hidden Moisture
Even “Dry” areas like crawl spaces or basements often hold enough humidity to trigger corrosion. Upgraded hardware provides a safety margin against these threats, ensuring that your connections remain structurally sound for years to come.
Conclusion
Choosing proper hardware isn’t just about meeting the standard code. It’s about protecting your home’s structure for the long term.
Stress corrosion is a serious problem. Quietly, it can weaken connections in areas that may appear dry. Therefore, it’s highly important that you choose quality hardware materials from the get-go.
For most Bay Area homeowners, hot-dipped galvanized (HDG) and Simpson Strong-Tie’s ZMAX hardware is a good option. This balances cost and corrosion resistance perfectly. For more coastal areas, stainless steel (A4) hardware and fasteners are recommended. Upgrading your hardware today means avoiding costly repairs tomorrow.
For guidance with comparing hardware materials for corrosion or installation, feel free to contact our professionals at Avant-Garde
When these codes aren’t met, however, a property is deemed unsafe. That’s why it’s important to know the most common code violations to ensure your building is safe and prepared.
What Are Seismic Building Codes?
Seismic building codes are legally enforceable standards to ensure buildings can withstand local seismic activity. They’re used in earthquake-prone regions, like the San Francisco Bay Area, to guarantee public safety, structural integrity, and property preservation.
How Is a Seismic Building Code Violated?
The most common reasons seismic building codes are violated are through overlooked work, outdated structure, or contractor shortcuts.
For example, in the Bay Area, we often see unpermitted or DIY renovations that bypass code review or older buildings that were never retrofitted.
Another way a code is violated is through contractors or construction errors. Perhaps an anchor bolt hole has been drilled oversized, the wrong size bolts have been used, or not enough bolts have been installed, etc.
Alongside the above, sometimes, codes just naturally get violated. A code might get updated, and the latest retrofit may no longer be adequate.
Most Common Seismic Building Code Violations
There are many common seismic building code violations. We believe that these are:
- Missing or Improper Foundation Bolting
- Unbraced Cripple Walls
- Unaddressed Soft-Story Conditions
- Lack of Shear Transfer Connections
- Non-Ductile Concrete Frames
1. Missing or Improper Foundation Bolting
The California building code requires sill plates (also known as mud sills) to be anchored to the foundation with steel bolts with bearing plates and nuts—with at least two exposed threads above the nuts.
Alongside this, there should be two per sill section (one near each end), and they shouldn’t be spaced more than 6 feet on center. At shear walls, the spacing is required at 32”. Bolts are also required at each end of the mudsill, and centered at the first and last bay of each shear panel.
In many older homes, think homes built before the 1950s, there may be no anchor bolts at all. In certain Bay Area cities, like San Francisco, though, 44% of homes have been built before 1940.
Not only this, but some contractors install foundation bolting incorrectly. Some may space them incorrectly, use the wrong type or embedment, install too few, or drill the holes too large, reducing the strength and integrity of the bolts and overall retrofit.
This code violation is massively problematic. Without proper foundation bolting, it can cause the house to slide off its foundation during seismic activity.
2. Unbraced Cripple Walls
Cripple walls are short wood-framed walls above the foundation on a raised floor. They’re there to increase the lateral strength of your property’s foundation/first floor.
The code (CBC) and retrofit guides require these walls to be sheathed with structural-grade plywood panels. They should also be tied to the framing.
Missing framing or plywood, however, means little cripple wall strength. This makes it extremely vulnerable during heavy earthquakes.
Most cripple walls lack plywood altogether, which is more common than you think, leaving them unbraced and weak.
In South Napa, this was a huge issue in 2014. A lot of the home were built before pre-1980s with inadequate cripple wall bracing, leading to many homes getting “red flagged” for structural failure.
When shear panels are installed, they must be properly framed, nailed, notched, spaced, sized, etc.. If any of these components are done incorrectly, which usually is the case, you will not have the required protection.
3. Soft-Story Conditions
A soft-story appears when the ground floor has an opening (garage door, large storefront window, etc.) spanning most of the property’s width with minimal shear walls. This, unfortunately, makes the first story remarkably weak compared to those above.
In the Bay Area, however, a large majority of apartment buildings and condos built before 1978 have soft stories. These, due to the time they were developed, don’t meet the modern seismic standard imposed by the state.
Currently, the SF Mandatory Soft-Story Retrofit Program is doing a great job of identifying these buildings in their area. Still, many continue to violate this building code.
Violating this means that the building has inadequate lateral resistance. In circumstances like a seismic earthquake, properties with poor soft-story conditions usually pancake or collapse.
4. Lack of Shear Transfer Connections
Local codes state that shear transfer ties/clips or blocking are required to tie the floor framing (joists/plates) to the braced wall or mudsill. With many Bay Area homes, though, this is usually overlooked.
What we often see is the contractor using the toe-nail connection per legacy framing standards. This states that you must nail three toe-nails per joist. However, this is generally the only connection; no metal connectors are installed, making it non-compliant.
Without this connection, especially with older homes, the floor can move off the braced wall during a quake. If this happens, the structural integrity of the property can be at risk.
Further, many modern retrofits often install the wrong type of connector, or leave fasteners missing and/ or not installed properly (most people use nails even though they know structural screws offer more strength, higher withdrawal rating, and have a lower chance to split the wood).
5. Non-Ductile Concrete Frames
Many of the Bay Area commercial buildings and even older apartments were constructed pre-1970. During this time, they used reinforced concrete frames. Though great for the time, now, these are considered to have a lack of rebar details (aka non-ductile concrete).
In a non-ductile building, columns don’t have closely spaced ties. As a result, instead of flexing during seismic activity, they shatter. This can cause the overall strength and loading of the building to be imbalanced.
All of these structures are also considered non-compliant. Yet, despite this, thousands remain in areas like San Francisco and Oakland. In fact, there are around 4,000 older concrete buildings in San Francisco alone.
How to Ensure Seismic Building Code Compliance
To bring an existing building into compliance, Bay Area owners should follow the clear retrofit process below:
1. Schedule a Professional Seismic Evaluation
Before anything, hire a licensed professional (preferably someone experienced in seismic retrofits) to take their time properly evaluating your property.
During this evaluation, they’ll thoroughly evaluate the entire crawl space and foundation plus reviewing any past retrofits. While most retrofits start in the crawl space, creating a continuous load path starting at the roof and transferring all the way down to the foundation is the only way to obtain the best level of protection.
You will find most contractors bending over backwards to give you a “free estimate.” For most homeowners, their home is the largest investment they will make, and your family spends at least 33% of their time home (assuming you sleep at least 8 hours a night every day at home).
When it comes to seismic protection for your home, and more importantly your family, you should not be looking for the cheapest or least amount of work done possible. You should instead look for contractors that actually have knowledge performing entire home retrofits, contractors that can thoroughly explain how an earthquake force can affect your home, and how your home may react during a strong seismic event.
There are specialty licenses for almost everything in construction, and yet, sadly, there is none for seismic retrofitting.
2. Review Local Requirements
In the Bay Area, building codes can vary by city. Therefore, after the evaluation, your seismic retrofit professional will guide you through any city-specific seismic requirements or ordinances.
Currently, there are several programs to understand. This is the San Francisco Soft-Story Retrofit Program, as well as the Oakland and Berkeley Ordinances.
The seismic retrofit professional you choose should confirm whether or not your property is subject to these new mandatory retrofit rules.
3. Obtain Retrofit Designs
Once the assessment is complete, your contractor or engineer will prepare a detailed set of retrofit drawings and specifications. These will specify the scope of work.
All of the plans should align with the California Building Code (CBC), California Residential Code (CRC), Chapter A3, Plan Set A, and/ or FEMA recommendations like FEMA P-1100, FEMA P-1100-2A, or FEMA P-1100-2B.
4. Hire a Licensed Contractor
Your next step is to hire a licensed contractor to carry out the work. A lot of the time, the retrofit designer will recommend someone or have a team that can carry out the work.
As a rule of thumb, you want to look for contractors that:
- Have experience with seismic retrofitting before the creation of grant programs like the Earthquake Brace + Bolt (EBB).
- Are familiar with seismic codes on a regional and city level.
- Actually have knowledge beyond the minimum requirements of Plan Set A (most contractors cannot even follow these two-page requirements properly).
Ideally, you want to avoid hiring general contractors with zero seismic retrofit experience and/ or cannot offer any recommendations for increased seismic protection.
5. Get Permits and Inspections
Once you have your retrofit plans, your contractor should apply for a building permit through the local building department. A city inspector will then verify the plans as well as perform on-site visits as the work is being carried out. Although the inspections should catch all non-complaint work, this often is not actually the case. Not only are the inspectors not given the proper amount of time to inspect, the plans are often missing key requirements, and the work is for the most part considered to be “just a voluntary seismic upgrade.” As long as the work does not actually make your home any worse, they often will approve anything. In some cases, we have seen seismic retrofits done so incorrectly that they actually did make the home more dangerous (and was still approved by the local building department, EBB, and FEMA).
Additionally, when a seismic retrofit is done incorrectly, but the homeowner does not know, they will have a false sense of security which ultimately may be a more dangerous situation than knowing your home is not safe.
6. Apply for Grants or Rebates
If you do not need to pay out of your own pocket, why do it? Before any work commences, look for grant programs that help property owners fund their seismic upgrades.
Nowadays, there are quite a few. Some popular options include:
- Earthquake Brace + Bolt (EBB): Offers up to $3,000 for foundation bolting and cripple wall bracing.
- Soft-Story Retrofit Grant: Provides up to $13,000 for eligible soft-story seismic retrofits.
- Low-Income Retrofit Assistance: Qualifying households may receive up to $5,800-$10,000 cost coverage through the EBB Supplemental Grant.
Ideally, your contractor will know what grants you can apply for.
7. Keep Documentation
When your retrofit is complete, keep records of everything. This includes stamped plans and valuations, permit applications, documented photos, invoice, etc. This will be essential for possible insurance claims, resale, or refinancing.
Contact Us
Our team at Avant-Garde are experts in seismic evaluation, retrofit design, and retrofit installation in the Bay Area.
It doesn’t matter whether you are concerned about a retrofit in San Francisco, a soft-story retrofit in Oakland, or foundation bolting; we’re here to help every step of the way.
To get a better understanding of how our team can help, contact us today . Waiting will be a professional ready to assist.
]]>The FEMA P-58 Seismic Methodology is a performance-based approach for evaluating how buildings will fare during earthquakes.
It was developed by the Applied Technology Council (ATC) as part of the ATC-58 project series for the Federal Emergency Management Agency (FEMA).
Unlike traditional code, which has a strong focus on minimum life-safety, the FEMA P-58 provides a complete risk assessment of a building’s likely earthquake damage and its consequences.
For example, instead of “ensuring the building won’t collapse”, it outlines estimates of how much damage could occur, how long repairs might take, what it might cost, and how much downtime would be needed, etc.
How Performance-based Seismic Design Works
Performance-based seismic design (PBSD) shifts the focus from meeting minimum building code safety standards to meeting owner-defined seismic goals.
Simply, building codes aim to prevent building collapse in a “design level” earthquake. However, they don’t guarantee that the building will be usable or economical to repair afterwards. PBSD, though, does.
At the beginning of a PBSD, the owners and stakeholders set clear performance targets. This could include maximum allowable downtime, repair costs, etc. For example, a hospital may require full functionality instantly after a moderate quake.
By using tools like the FEMA P-58, professionals can model and compare design options early in the process. This then allows them to develop a seismic design plan that meets the goals of the owners or stakeholders to meet their post-seismic goals.
When to Use FEMA P-58
Not every project requires a full FEMA P-58 analysis. After all, it requires additional effort and design. However, it is always recommended, and even insights from such methodology are valuable.
High-Value or Critical Facilities
This could include anything such as residential homes, hospitals, emergency operation centers, data centers, telecommunication hubs, major manufacturing plants, or power utilities. Pretty much, any building that must function or be inhabited after an earthquake.
These facilities, if they encounter downtime, could be life-threatening. That’s why such facilities should have a FEMA P-58 seismic plan instead of an “ordinary” code-compliant seismic design plan.
Protecting What is Inside the Building
Some projects are less about protecting the building itself and more about what is inside.
If you and your family sleep at home at least 8 hours every night, then there is at least a 33% chance you and/ or your family will be home during the next major seismic event. Your family and loved ones deserve the very best when it comes to seismic protection, and the minimum required work is not designed to protect your home or family from extensive damage.
For general buildings besides your home, these could be anything from museums to archives, high-tech laboratories, art galleries, data storage centers, and so forth.
In these cases, whether the building survives or not isn’t the key issue. The goal is to protect the goods inside. Therefore, a FEMA P-58 plan will look into the probability of things like sprinkler leaks, ceiling collapse, etc., to protect them.
Projects in High Seismic Risk Zones
If a structure is located in an area with a high likelihood of seismic activity, like California’s San Andreas and Hayward fault regions, the Pacific Northwest, etc., a PBSD could help reduce the deadliness of the “big one”.
For example, the “big one” in the San Francisco Bay Area could be a magnitude of 7.5. However, codes only ensure that most properties, such as residential, can handle minor quakes. Therefore, major earthquakes still pose a serious threat with standard seismic codes.
Real Estate Transactions & Investments
FEMA P-58 isn’t just for design. It can also be used as a powerful due diligence and risk assessment tool when buying, leasing, or financing a building.
By getting a professional to review the current real estate plans, you’ll be able to determine how earthquake-ready the property is. This can then sway your decision on whether or not to make the purchase.
Construction Retrofits
When retrofitting existing buildings that are known to be vulnerable, a FEMA P-58 can guide a targeted retrofit strategy to achieve certain performance metrics. This ensures that your retrofit upgrades protect your property in a way suited to your goals.
The Process of FEMA P-58
If you decide to use FEMA P-58 on a project, the process looks a little like the following:
- Define Performance Goals: Establish clear, quantitative resilience objectives early in the project. Identify acceptable limits for downtime, repair costs, and safety risks.
- Assemble a Qualified Design Team: Engage experienced professionals who are familiar with FEMA P-58/PBSD. This may include architects, MEP engineers, seismic risk consultants, contractors, and cost estimators.
- Conduct Preliminary Performance Assessment: Use the conceptual design phase to run early FEMA P-58 analyses. Test multiple structural systems and identify risky elements or design.
- Refine Design and Align with Goals: Move into a detailed design with more precise FEMA P-58 assessments. Use an iterative analysis-feedback-design cycle until all the performance indicators meet targets.
- Final Verification and Implementation: Perform final FEMA P-58 analysis to prove design meets performance goals. Document all expected losses, downtime, and causality risk for personal or stakeholder review.
Benefits of FEMA P-58
Using the FEMA P-58 methodology (and PBSD in general) can provide multiple benefits for building owners, occupants, and even the broader community.
Here are some major advantages:
Saving Lives, Reduced Downtime, and Business Disruption
The biggest benefit of getting a FEMA P-58 seismic design is to save lives. When retrofitting your home, the goal is to protect everyone inside and prevent as much damage as possible.
For a non-residential structure, it is about protecting the staff and clients inside, plus the ability to remain functional or recover quicker.
Traditional code-designed buildings, in some circumstances, can be closed or non-inhabitable for months (maybe even years) for repair after a big quake.
With a P-58-optimized building, however, you can specially develop a building design where the building doesn’t need repairing after a certain magnitude of quake.
This is vital for not only your home, but also for community buildings, like hospitals and grocery stores. If such buildings need extensive repairs after a large quake, it could be life-threatening to many in the area.
Not only this, but it could be financially threatening if your home becomes inhabitable or your business need to close down due to repairs for a while. This may even put you into bankruptcy.
Financial Risk Control
Using a FEMA P-58 also means fewer financial surprises when we experience an earthquake. The reason for this is that you likely know the outcome (in regards to dollars) based on the analysis provided.
For example, with a standard seismic-code property, you won’t know how much damage you might encounter. With a FEMA P-58 design, though, you’ll have realistic values on how much it may cost you if your building needed to be repaired due to a quake.
From a risk management perspective, the P-58 enables what people like to call a risk-based design. While developing the design, you set an acceptable risk (in terms of dollars) and create it in such a way.
Let’s say you don’t want the repairs of your building to exceed 10% of its value after a magnitude of 5 or more. In that case, in the previous design and development steps, the building would have been designed to meet these goals.
Enhanced Property Value and Marketability
Alongside the above, buildings designed for high seismic performance can demand a high market price (especially in high seismic zones).
For instance, in regions like California, some buyers and tenants are looking for buildings with higher seismic ratings. This is because some regions in California have high seismic risk.
If you can show that your building has, for instance, a USRC Platinum rating or has been performance-designed to minimal damage, it’s a strong selling point.
In fact, FEMA has even mentioned that better building earthquake resilience does increase the value of the property.
Community and Environmental Resilience
Beyond the individual building and owner, there are broader societal benefits to designing with FEMA P-58.
Simply, a community with more earthquake-resilient buildings will recover faster after a disaster. They can support the entire community.
A FEMA P-58 designed building will likely need less extensive repairs, demolition, etc. Therefore, services can be spread elsewhere and to those who are more in need.
Conclusion
Overall, FEMA P-58 enables homeowners, building owners, designers, and investors to move beyond the one-size-fits-all seismic design approach.
By quantifying earthquake risks in terms of dollars, downtime, and casualties it brings clarity to the seismic performance of your property.
If you’d like a FEMA P-58 seismic design today, contact our professionals at Avant Garde.
We’ll be more than happy to listen to your seismic goals, develop a plan, and, most importantly, execute on it.
]]>In earthquake-prone regions, building owners and developers need to weigh up their design approach carefully.
Typically, there are two paths: meeting code-based standards or pursuing a custom, performance-based seismic design.
The best option? Well, that depends on your goals and needs. That’s why we’ll compare both options side by side below.
What is Code-Based Seismic Design
A code-based seismic design refers to designing a building or retrofit in strict accordance with the local, regional, and national building codes.
The goal of such a design is to protect life. It’s been developed by the International Building Code (IBC) to ensure the structure won’t collapse and occupants can safely evacuate during a code-defined earthquake event.
This approach provides clear, prescriptive standards that professionals can follow, and if these standards are met, the building will be compliant with legal safety mandates.
A big problem is; however, that many times these standards are not even being met due to poor implementation and lack of proper inspections.
What is Performance-Based Seismic Design
A performance-based seismic design is a tailored, goal-oriented approach to earthquake design. It goes beyond the one-size-fits-all code approach and offers a bespoke option set to meet specific seismic performance objectives.
Following this approach doesn’t only focus on life safety. It also helps control damage and functional recovery after seismic activity. For example, the expected damage, repair costs, and downtime under certain strengths of seismic events.
Rather than following the generic code formula, professionals can use advanced analysis techniques to predict the building’s response to various earthquake scenarios, designing the structure to meet performance targets.
Pros and Cons of Code-Based Seismic Design
Code-based seismic design is the default for most projects, especially those that are budget-friendly or don’t need to meet special performance requirements.
Pros
Lower Initial Cost
For most projects, designing for code is the most affordable option upfront. You are only meeting the minimum required strength and detailing requirements, meaning less reinforcement, fewer specialized materials, and simpler retrofit or construction.
Clear Standards
Another benefit of code-based seismic design is that it’s backed by clear, standardized criteria. Simply, they provide a universally applied set of rules and calculations that engineers, contractors, and building officials all understand.
Due to this, it means the design and construction process is relatively straightforward. Normal processes and materials are used, so there’s a reduced need for specialized expertise, equipment, or goods.
Meets Legal Compliance
Designing a building to code is the law. By using a code-based design, you guarantee that your building meets all the legal compliance requirements.
By following the code, owners can be confident that they are meeting the required legal obligation for earthquake safety.
Cons
False Sense of Security
Many homeowners go this route; however, other contractors typically overlook critical requirements— leaving you with a seismic retrofit that will not perform as expected.
Uncertain Post-Earthquake Usability
The biggest drawback of code-based design is what happens after the earthquake.
While a code-designed building is unlikely to collapse, there’s no guarantee that it will be usable or safe to reoccupy in the aftermath. In fact, the code allows the building to sustain significant damage as long as lives are protected.
Therefore, even when a building meets code, it can be unusable for months or even condemned, resulting in loss of housing, revenue, etc.
Hidden Financial Risks
A code-based design is a cheaper alternative upfront. However, it doesn’t account for the aftermath damage for things such as downtime or loss of residence.
If a code-compliant building is badly damaged by an earthquake (a very real possibility), the owner may encounter massive repair bills, business interruption costs, and more.
One-Size-Fits-All Approach
Regardless of the building’s specific use or the owner’s priorities, a code-based seismic plan is almost the same for all buildings.
The major issue with this is that not all buildings and building owners have the same requirements. A building, for instance, like a museum with priceless artifacts, needs a very different seismic design plan from a residential house.
Pros and Cons of Performance-Based Seismic Design
Despite being more expensive to develop, a performance-based design offers protection based on the owner’s goals. This level of design allows you to construct a building with aftermath priorities aligned.
Pros
Tailored Protection to Goals
With a performance-based design, you tailor your seismic protection to the owner’s specific goals. Therefore, you’re not limited to the code’s single performance level.
Instead, the owner defines what “success” looks like for a building after an earthquake. For example, whether the building is fully operational immediately after a major quake or if it can take a few weeks to repair.
That’s just one instance as well, it could be how much repairs cost, where the building can and cannot collapse to protect certain goods, and so forth.
Essentially, using a performance-based seismic design allows owners to align the design with their business or operational needs.
Reduced Downtime and Quicker Recovery
Alongside the above, you can reduce the downtime a property encounters. This can be done through the design stages.
Simply, the owner chooses an appropriate downtime for the building, and the engineers design it in a way that the building meets those requirements after a quake.
For example, a hospital needs to be instantly available after an earthquake. In this case, it’ll need to be designed using a performance-based seismic plan that allows for such protection.
Better Risk Transparency
Naturally, with a performance-based seismic design, you get more information and insights into your building and its earthquake protection.
This allows building owners to get a clearer picture of the expected earthquake performance under multiple quake strengths.
It’s possible to then use this information to plan for such events. For example, a building can be designed to suffer $500k in damage after a 7.0 earthquake. By knowing this, the owner, business, etc., can then ensure they have these funds on standby in case it happens.
Long-Term Value and Resilience
Alongside the above, investing in performance-based seismic design can provide long-term value for property owners and communities.
While it may cost more upfront, the payoff is a building that is far less likely to encounter catastrophic damage or require lengthy closure after a quake.
Cons
Higher Upfront Cost
Due to the research required, specialized expertise, etc., the cost of a performance-based seismic design has much higher upfront costs.
There’s no way around it. Aiming for better seismic performance will require a bigger investment during design and construction.
Greater Complexity
By nature, a performance-based seismic design is more complex and involved than a code-based design. The planning, skills required, and the materials used are different and often require specialized expertise.
For example, when it comes to designing the building’s structure, complicated analysis techniques are used. The time will simulate dozens of earthquake scenarios and tweak the design to fix weak points to ensure multiple performance metrics are met.
Performance-Based vs. Code-Based Comparison
| Factor | Code-Based Design | Performance-Based Design |
| Goal | Life safety, collapse prevention, meets legal standards. | Protects lives and functionality with owner-defined performance goals. |
| Post-Earthquake Usability | Uncertain – building may be heavily damaged and unusable. | High – can be designed for quick reoccupancy or continuous operation. |
| Upfront Cost | Lower initial cost; most economical. | Higher upfront cost due to added analysis and strengthening. |
| Flexibility | Prescriptive, one-size-fits-all. | Flexible, tailored to building use and owner priorities. |
| Risk Transparency | Limited insight into damage/downtime. | Detailed predictions of repair costs, downtime, and risks. |
| Best For | Budget-sensitive, lower-priority buildings. | Critical, high-value, or long-term facilities needing resilience. |
Which Approach is Best for You?
Deciding between code-based and performance-based seismic design depends on three key factors:
- Building Type: Buildings such as hospitals, data centers, or emergency hubs will usually need a performance-based design to stay functional. Lower-priority structures, such as warehouses, may be fine with code-based compliance.
- Owner Priorities: If minimizing upfront costs and meeting legal requirements is your goal, a code-based design is enough. If you want to protect long-term investment, rental income, etc., performance-based seismic design is the safer choice.
- Budget: Performance-based seismic design will cost more upfront, but can save you on downtime and building damage after a quake. A code-based design, though, will be cheaper initially but may expose you to financial exposure.
At the end of the day, the best options depend on your requirements. Sometimes a standard code design is suitable, while other times, a performance-based seismic design.
Conclusion
When it comes to performance-based vs code-based seismic design, the difference comes down to personal goals.
While a performance-based seismic design can be costly, it can offer more protection. On the other hand, while a code-based seismic design is more affordable, it can cost more in the aftermath.
The best option? It depends on your goals and building. To see which is best for your specific situation, feel free to contact our professionals at Avant-Garde.
]]>When it comes to earthquake performance goals, you can just follow the “code”, for example, for those in the Bay Area, the CBSC, IBC, and local building regulations. However, for most buildings, these “codes” aren’t good enough performance goals.
The reason for this is that these codes are designed to stop building collapse. At first glance, they seem great; however, they do not account for function preservation or minimal financial loss in such events. This goes unaccounted for.
As a result, property owners need to come up with real earthquake performance goals, which, normally, require additional seismic protection. These goals should be specific to your building, such as its activities, occupants, contents, recovery needs, and financial considerations.
What Really Matters to You?
Simply, earthquake/seismic performance goals should reflect your priorities. Codes may save your building from collapse and limit fatalities. Goals, on the other hand, help reduce downtime, protect a building’s internal infrastructure, etc.
For example, imagine you own a hospital. With such buildings, you want to limit or eliminate downtime. This means you want to protect the building as well as its contents. If the contents are damaged, like fire sprinklers, etc., it may need to be shut down until repaired.
Now, let’s say you had a warehouse. Of course, you don’t want this to collapse, but you may accept downtime a little more. At the end of the day, it’s less life-threatening if a warehouse cannot re-begin work for a few days, weeks, etc.
This makes the question, “What really matters to me?”, very important. Before creating any performance goals, you need to repeat this. By asking yourself such a question, you’ll be able to create a performance-based seismic design specific to your goals and situation.
Key Questions to Guide Your Performance Goals
When establishing earthquake performance goals for your building, it helps to break down the problem into a few key areas:
- Activities in the Building
- Occupants and Contents
- Post-Earthquake Recovery Needs
- Financial Considerations
Activities in the Building
- What is the building used for, and which functions are mission-critical? Identify the primary activities that happen in the facility that are deemed essential to your business or mission (for example, operations that impact your revenue, reputation, or anything that cannot be moved elsewhere)
- How would an earthquake disrupt those activities? Consider how damage or loss of utilities, like power, water, gas, internet, etc., could impact your essential operations. You should also think about how costly or difficult it would be to relocate or how long you could survive if the operations were to stop.
Occupants and Contents
- Who uses the building, and are any occupants especially vulnerable? Think about how many people are in the building and who is in the building. Particularly vulnerable individuals, like children, the elderly, and those with limited mobility, will need extra protection.
- What valuable contents or equipment are inside? For example, specialized machinery, servers, research samples, artwork, archives, etc. The best way to answer this question is to think about how hard (or costly) it would be to repair or replace certain items if they were to become damaged.
- Are there hazardous materials present? These types of materials could present serious health or environmental risks. Consider what materials may need additional protection to prevent the spillage or release of such chemicals.
- What if people can’t access the building? If your staff or residents cannot enter the facility for days, weeks, and maybe even months, what would be the consequence? Would it prevent them from doing their jobs, accessing important materials they need, etc.?
Post-Earthquake Recovery Needs
- How quickly do you need to resume operations? Determine what’s at stake if your building is unusable for an extended period of time. If you can only handle minimal interruption, your performance goals should reflect that.
- Is the building needed immediately after a quake? If your building is required immediately after seismic activity, for example, any emergency response building, this will massively increase the required performance level.
- Will people shelter on-site? Consider what occupants, staff, or community members may rely on if they can no longer use this building for shelter. What would be the steps to ensure they have shelter until the building is deemed safe again?
Financial Considerations
- What financial losses are you willing to tolerate? On average, an earthquake can cause around $4.4 billion in damage. Therefore, you need to think about the economic impact that can come along with disrupted operations and how much you can handle.
- Could the building be a total loss? In a worst-case scenario, a very heavily damaged building may need to be demolished. Could you handle this? What would the impact be on your operations and financial well-being?
- Do you have funds to repair quickly? After an earthquake, having the liquidity (or insurance payouts) to start repairs as soon as possible is crucial. If you know resources may be tight, designing for higher performance may be wise.
- What about reputation and liability? You should also consider less tangible costs. For example, if your building gets red-tagged, how would that affect your organization’s reputation, public relations, or even legal liability?
Performance Goals Should Vary by Earthquake Size
Small, frequent tremors can impact your building differently than rare, catastrophic quakes. Your goals should reflect this as well.
Generally speaking, it’s reasonable to accept that a major, very rare earthquake might cause some damage, financial loss, and downtime. Simply designing a building for absolutely no damage in the worst-case event is, most of the time, impractical.
However, for something like a moderate earthquake, which has a higher chance of occurring, you might expect your building to remain functional with only minor repairs needed.
In other words, your performance goals should align with your targets for safety, repair time, and allowable damage to expect earthquake severity. For moderate events, you may set high performance expectations, while for extreme events, the objective may be more forgiving.
One useful tool for this is a performance goal-setting worksheet. This is a simple table where you can define acceptable outcomes for different earthquake scenarios—for example, moderate and rare events. By filling in the target outcomes, you can make decisions on what you’re willing to tolerate.
Example of an Earthquake Performance Goal Worksheet
| Performance Category | Moderate Quake (More Likely) | Large Quake (Rare) | Major Quake (Very Rare) |
| Level of Safety | No injuries | < 1% chance of injuries | Some injuries possible |
| Max. Acceptable Downtime | 1 day | 1 month | 6 months |
| Max. Acceptable Repair Cost | 1% of building replacement cost | 20% of building replacement cost | 50% of building replacement cost |
| Level of Protection for Contents | 90% chance critical contents intact | 50% chance intact | 10% chance intact |
| Functionality After Quake | Fully operational | Limited services functional | Non-operational until repairs complete |
| Acceptable Chance of Collapse | < 1% | < 5% | < 10% |
| Acceptable Chance of Red Tag | < 10% | < 25% | < 50% |
| Utility Availability | Full availability within 24 hours | Available within 1 week | Gradual restoration over several weeks |
| Emergency Access for Occupants | Always accessible | Temporary access interruptions | Access restricted |
| Environmental Hazard Containment | No release of hazardous materials | Minor release, contained immediately | Risk of larger release, response needed |
| Sheltering Capacity | Can shelter-in-place for 48–72 hours | Partial sheltering possible | Not suitable for sheltering |
| Recovery Cost Tolerance | Minimal disruption to budget | Requires budget reallocation | May require external funding/insurance |
Developing a Performance-based Seismic Design
Once you’ve designed your earthquake performance goals, the next step is to find a qualified professional to turn these goals into a feasible plan. This is known as a performance-based seismic design.
According to FEMA P-58, performance-based seismic design evaluates a building’s expected behavior under different earthquake scenarios, including potential repair costs, downtime, and occupant safety—allowing building owners to tailor designs to their specific risk tolerance and operational priorities.
Unlike a conventional code-based approach, which primarily aims to prevent total collapse, a performance-based approach aims to achieve specific outcomes you want for your building (life safety, financial safety, downtime minimization, etc.).
For example, if your goal is “immediate occupancy” after a moderate earthquake, these engineers will develop a design to limit the internal and external damage of your property to allow for this.
Contact Us Today
Developing and implementing earthquake performance goals should be left to the professionals. If you want to protect your property, staff, residents, and investment today, contact our team at Avant-Garde.
Our team will listen to your goals and help develop a performance-based seismic design to fulfill your needs. Once approved, they can then actualize this design using the best materials and following the best practices. See the difference we can make today.
]]>EBB Retrofit Preparation & Guide
For Homeowners Working with Avant-Garde Construction Enterprise
Licensed • Bonded • Insured | Serving the Entire San Francisco Bay Area
 1. Preparing for Your Consultation
Before your consultation with Avant-Garde, we recommend:
-
Gather Documents: Locate any original building plans, engineering reports, or past retrofit documentation.
-
Take Photos: Photograph your crawl space, foundation edges, any visible cracks, and areas of concern.
-
Clear Access: Ensure easy access to the crawl space and foundation—remove stored items or debris.
-
List Concerns: Write down any structural issues you’ve noticed (e.g., uneven floors, moisture, odors).
 2. Questions to Ask All Contractors
Ask these questions while selecting which contractor will be trusted to protect your home and family:
Technical
-
What is the current condition of my crawl space and foundation?
If the response if short and vague, beware. -
Will you use structural screws or nails — and why?
There is a huge disparity between the two. -
How do you deal with tight crawl spaces, wiring, plumbing, or HVAC obstructions?
Look for well defined answers. -
What are your recommended upgrades beyond the required work, if any?
If there are none, avoid at all costs. -
Why do you seismic retrofit homes, and when did you start?
If it is only to participate in the work provided from the EBB program, they are probably not a real seismic retrofit expert. -
What other services do you provide?
If seismic retrofit work is not their main service, you may want to reconsider choosing them.
EBB Program & Compliance
-
Will this retrofit qualify for the Earthquake Brace + Bolt program?
-
Do you help with the EBB documentation and photo uploads?
-
Can I see examples of previous compliant EBB projects you’ve completed?
Timeline & Logistics
-
What’s the estimated start date and how long will the job take?
-
Will I lose access to utilities during any part of the work?
-
Do I need to vacate or modify anything inside my home?
Quality & Assurance
-
How do you ensure my systems (electrical, plumbing, HVAC) won’t be damaged?
-
Do you provide before & after photos for transparency?
-
What warranties or post-retrofit support do you offer?
- What quality control practices do you have in place?
 3. Permits, EBB Reimbursement & What to Expect
Permits
-
Required for any retrofit — Avant-Garde handles permitting, plan submission, and inspections.
EBB Reimbursement
-
You may qualify for a $3,000- $10,000 grant if accepted into the EBB Program.
-
Requirements:
-
Use an EBB-registered contractor (Avant-Garde qualifies)
-
Complete the retrofit and pass city inspection
-
Submit signed contract, photos, permit, and final inspection approval online
-
What to Expect During the Retrofit
-
Expect:
-
Dust (controlled), noise, and limited crawl space access for a few days
-
Most EBB retrofits take 1–5 working days
-
Professional site protection and daily cleanup from Avant-Garde’s team
-
 4. Post-Retrofit Inspection Guide
Once the job is done, make sure:
-
Bolts are installed properly, per plan
-
Shear walls (plywood bracing) are securely and neatly fastened (if your home has cripple walls)
-
Plumbing, electrical, and HVAC are undisturbed
-
Crawl space is safe and clean
-
All construction debris is removed
-
A final inspection is passed and signed off by the city
 You Will Receive:
-
 Before & After Project Photos
 -
 Final Invoice
 -
 Permit Copies & Approved Drawings
 -
 EBB Documentation Packet (Avant-Garde assists with this)
 Questions? Need Help?
Avant-Garde Construction Enterprise is with you every step of the way.
Contact Matthew Gatterman directly if you need guidance before or after your retrofit.